Cineserge

Living a dream as a photographer & filmmaker

indiSystem Follow Focus Review

indiSystem Follow Focus Review [including a repeatable focus pull test].
Reviewed by +Serge Batyrshin in December 2012.
Combatively priced, well functioning alternative to the more expensive units from Zacuto and RedRock.  Marking disc is a plus, no crank/whip port. Friction-based: no need for ugly lens gears.
Rating: 4.0 / 5.0

indiSystem Follow Focus - images courtesy of indiSystem


Introduction


In my continuing quest to build the right DSLR cinema rig, I have purchased indiSystem indiFocusSwee Follow Focus.  This is my impressions and unofficial review.

First off, I find prices on Follow Focus units are somewhat outrageous.  Arri makes a great one, so does Zakuto, RedRock [I used to own one], and Opteka [in that order of quality/price], and many others.  They all cost way too much, in my opinion.  I was looking for a less expensive unit.  This unit had to have gearless design and cost an amount I could afford [99 bucks].

Now, there aren't too many reviews for this unit on the Web, so I figured I'll give it a try and see how it does...

The follow focus I was looking for had specific requirements [if this is what you require  then this unit could be for you]:

1.  Gearless design.  Because the lenses I use for cinematography, I also use for photography, I didn't want to attach any external gear ring to the lens.

2.  Has to have a marking disc.

3.  Has to utilize 15mm rod system.

4.  Good price - 99 bucks!

This unit does not have a slot for a whip or crank.  I don't have any use for them anyways, so that wasn't an issue for me.  The disc can be positioned on either side of the turn knob, so that's a plus.  There's a marking disc on the knob, so I could make my focus marks.  Overall, this is everything that I need!  Let's move to setting it up and using it.


Setup


Beware, that this follow focus doesn't have vertical adjustment, which presents an issue if you're using a camera with built in battery grip, like the D4. I had to add a riser and a set of rails to bring the unit closer to the lens.  Also, the clamp design/build is not the best, but workable.


Operation


Once on the rig, it worked fine.  I was able to achieve repeatable, dependable, and accurate focus pulls.  Basically, it worked as advertised. See the video and photos below.  


Conclusion 

I'd like to say that it takes some adjustment to operate an inexpensive no gear follow focus, but at the end it works just as well.  As for durability - only time will tell.  I will write an update in a year to see how this 99 dollar follow focus from indiSystem held up!


Related Posts

  1. Putting together the right DSLR cinema rig

What's next?

  1. Subscribe to updates by email
  2. Follow on Twitter & Facebook
  3. If you liked this post, please share it ;)

    Mission Impossible? Putting together the right DSLR cinema rig - Part 1


    Personally, I am disturbed by the fact that DSLR rigs are so outrageously priced.  Manufacturers are driven by the high prices of equipment in the movie industry as well as demand for DSLR gear, because of the DSLR filmmaking revolution.  I understand pros like I'm on mission to find more affordable rig, that's still usable, to add to my gear bag.

    After selling my ENG-style Panasonic HPX300 and buying the Nikon D4 DSLR, I was on a mission to find the right DSLR shoulder rig.  I say the right rig, because for me it means the best rig I can buy on my budget.

    I have looked at various rigs from +Redrock Micro, Cinevate, Zakuto, and others.  I just don't want to pay one thousand, two thousand, three thousand bucks for this hardware.  It probably takes 50 bucks to make one, why are they charging so much?

    I like RedRock equipment, and it's priced better than Zakuto, for example.  But I needed something that was cheaper more affordable, and still good quality.  So I found the RedRock imitation Flashpoint, sold by Adorama.  Ok, now we're getting close: a few hundred bucks, and I'll be in business.


    Rig Components


    I have made a list of everything that I will need to put together a DSLR rig.  It will have both shoulder and tripod/steadicam support.
    1. Camera mounting plate - DONE
    2. Mattebox - DONE
    3. Shoulder pad - DONE
    4. Counterweight - DONE
    5. Handle grips - DONE
    6. Remote switch - DONE
    7. Field Recorder/Monitor (Atomos Ninja 2)
    8. Follow Focus (reviewed) - DONE
    9. Cage (possibly) + top handle - DONE
    10. Articulating arms - DONE
    These components should provide versatility to the rig, allowing to shoot on sticks, shoulder, steadicam, etc...


    DSLR shoulder rig


    While searching on the Internet, I came across a generic DSLR rig that looked like the RedRock/Flashpoint, but cost 199 bucks, so I bought it. Here are product links to Amazon and LinkDelight.


    This shoulder rig is made in Taiwan, and looks just like the RedRock/Flashpoint rig.  The build quality is ok; it's nowhere near the quality of an American-made product, but with this price tag, it was expected.  I feel that for the task that this rig has to do - it'll do just fine.  It works as advertised: steadies your camera on the shoulder ;)  The rig has a camera plate with a bottom tripod plate, so its ready to go on sticks.  It also has the shoulder pad - a cheap one, but it is comfortable and it works!  The kit comes with handlebars.  They are nice and comfortable to hold.  Everything mounts on 15mm rods - industry standard.  After putting together the rig I noticed that it is solid and rigid, which was unexpected for the kit that cost 199 dollars - so we're good to go here; moving on to the next piece.


    Mattebox


    Now that I have the shoulder rig, I needed a mattebox.  Once again, while I like Arri, Cavision, and other pro matteboxes, I cant spend several thousand dollors on it.  Once again, RedRock makes one, and I used to have it with my old camera (Panasonic HPX300), but I felt that it would be too big for my current DSLR setup (Nikon D4).  By the way, Flashpoint by Adorama has the same looking mattebox, almost 4 times cheaper.  Go figure...

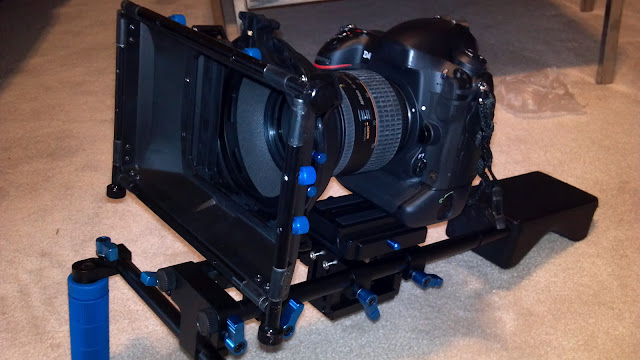
    So, I wanted a lighter, smaller mattebox.  No clip-ons, 15mm rails setup.  Found one!  Flashpoint Basic Mattebox II. Here it is on Adorama (RedStar version here).  This matebox will do just fine.  It is not flimsy - fairly solid build, and really how tough the mattebox should be?  You're not hitting baseballs with it, right!

    The mattebox has 2 filter trays, 4x4.  I had some biger filters left over from RedRock mattebox, so they will not fit.  That's ok.  I will buy 3 ND filters for it - they are not too expensive.

    It also has a top french flag as well as side barn doors.  I dont usually use those, but on occasion I have, and they come handy mid-day with bright sunlight entering the lens.

    Here's the description from Adorama:
    Designed to prevent lens flare and glare from natural and artificial light sources, the Flashpoint Matte Box offers everything you need to get started whether you're shooting with a digital video camera or a DSLR. This lightweight but sturdy device is equipped with dual ABS plastic filter frames and stages and can accommodate filters 4 x 4" and 4 x 4.5" filters. One filter stage can be rotated 360 degrees when shooting with circular polarizing or gradient filters; the other is fixed. Both filter frames can be locked in position but are easily removed. Three donuts are bundled with the Matte Box. Constructed from thick and durable neoprene, the donuts fit snugly against the Matte Box's 100mm back mount opening. Inside circumferences measure 48mm, 64mm and 74mm to accommodate a widerange of lenses for all your shooting needs. The removable coated aluminum French flag and two side doors attach securely viaa bayonet mount and thumb screws. The blades are easily adjusted-even while looking through the viewfinder for the most precise placement-and can be folded flat for storage or protection of the lens during transport.

    So I like this mattebox a lot - its just the right size, not expensive, has filter option as well as french flags.  Just what I needed.  Will it survive years of abuse? Probably not, but I will get a few years out of it for sure.

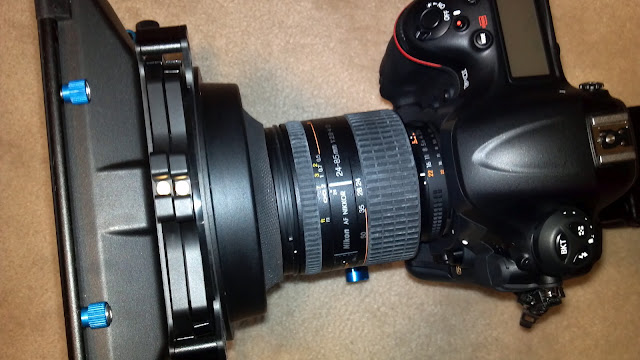
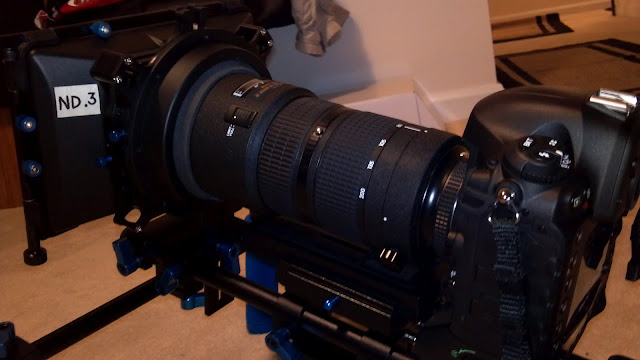
    DSLR cinema rig: mattebox

    DSLR cinema rig: mattebox

    DSLR cinema rig: mattebox


    Record Button Remote switch


    Next thing on the list is a remote switch. I found a great deal on Amazon: Vello 10pin wired remote release for Nikon cameras. I attached the switch to one of the handles on the rig, so that I dont have to reach for the top of the camera to press the record button.  The switch has a 10 pin wired plug that plugs in to the 10 pin connector on the side of the camera.  Nice.

    One thing to add here is that I had to go into Nikon D4's menu and change the shutter button preference to Record, so that it acts like the actual record button.  That's all.


    Vello remote control for Nikon camera for DSLR cinema rig


    Counterweight


    To balance the camera on the shoulder I have added a counter weight.  Opteka makes an affordable 3lb counter weight that attches to the 15mm rods nicely.  Here it is:

    Building a DSLR cinema rig: Opteka counter weight for DSLR rigs


    More to come


    I will still need to get the follow-focus, a cage (possibly), articulating arms, and a field/recorder monitor.  More about that in Part 2.  Stay tuned!

    Share your experience with DSLR cinema rigs by commenting below.


    Related Posts

    1. COMING SOON: Part 2 of Putting together a DSLR cinema rig
    2. More post about filmmaking

    What's next?

    1. Subscribe to updates by email
    2. Follow on Twitter & Facebook
    3. If you liked this post, please share it ;)

      What's in my gear bag?

      Nikon D4 - what's in my gear bag - push processed

      I believe that equipment should be the extension of the artist.  I dont chase the latest and greatest gear (except for D4, because it is a great camera that I plan on keeping for a long time).  I am also not into too tech details and tests.  I believe real-life field tests are more valuable.  Also, it is not the camera that makes the image, it is the photographer/cinematographer.

      But, it helps to have the right gear.  So, in my pursuit of the right gear, this what I currently have, used to have, or want to have ;)

      Here's what I currently have:
      1. Nikon D4
      2. Nikkor 80-200mm 2.8
      3. Nikkor 24-85mm 2.8-4
      4. Nikkor 50mm 1.4
      5. Nikkor 12-24mm (DX)
      6. Manfrotto Photo tripod
      7. SB800 speedlite
      8. SB600 speedlite
      9. Vella 10pin Remote for Nikon
      10. No brand DSLR Shoulder Rig
      11. Flashpoint Mattebox
      12. indieSystem follow focus

      Here's what I sold and no longer have:
      1. Panasonic HPX300
      2. Redrock mattebox
      3. Redrock follow focus
      4. Glidecam X4500
      5. Libec Video Tripod
      6. Nikon F5

      Here's what I want to have ;)
      1. Atomos Ninja 2 field recorder/monitor
      2. Video Tripod
      3. On-camera field monitor (5 or 7 inch) for AC


      Related Posts

      1. Putting together the right DSLR cinema rig
      2. More gear reviews
      3. Nikon D4 archives

      What's next?

      1. Subscribe to updates by email
      2. Follow on Twitter & Facebook
      3. If you liked this post, please share it ;)